Namaste everybody :) Greetings from 'Something Different'.
Today we have brought for you another wall decor tutorial to brighten up your room. Lets add some colours :)

Here's how we made it :
Step 1: Choose any coloured paper sheets. Cut rectangular pieces of size 27 cm x 18 cm out of each sheet. Mark lines at distances as shown in the image below.

Step 2: Now cut the internal rectangle. And make folds along the lines as shown in following image.
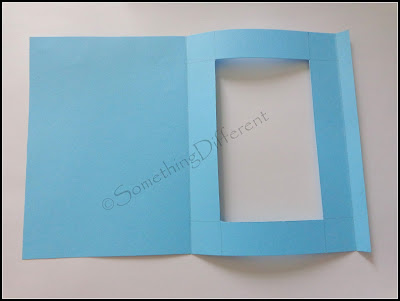
Step 3: Mark a line at a distance (say 1 cm from cutout area). Apply glue to the area on the right side of this marked line as shown. Make sure there is no glue on the left side of the marked line.

Step 4. Fold the paper along the first fold that we made in beginning (along the line at distance 13 cm). And then again fold along second small fold (we had made earlier) over it so as to secure our entire glued piece together. It should look like this now.

Step 5: Make other pieces in a similar way.

Step 6: Now decorate these pieces as you wish. We have used quilling technique to make this floral decorations. You can use glitter, stickers, stamps, punch crafts, or you can even paint.

Step 7: We are gonna use ribbon to make this wall hanging. Approx. 4 feet ribbon is needed.
Start with the bottom piece. Stick ribbon to the backside of the piece as shown. Then leave some gap and go on to next piece. In this way, stick ribbon to both ends of all the pieces.

There you have it. A beautiful, colourful wall decor piece for your room :) You can put your photos in these paper frames. Standard (4 x 6 inches) photos will fit in it perfectly.
Or you can write your favorite quotes on some white paper (size 4 x 6 inches) and slide through these frames and you are done!! :) :)
Hope you enjoy making this wall hanging.
See you soon :)
You can also find us on
Twitter: www.twitter.com/Smth_diff_craft
Pinterest: http://www.pinterest.com/smth_diff_craft/
Instagram: instagram.com/smth_diff_craft